
Hack The Box: Cicada Machine Walkthrough – Easy Difficulty
Easy Machine Challenges, evil-winrm, HackTheBox, NetExec, Penetration Testing, SeBackupPrivilege, smbclient, WindowsIntroduction on Cicada:

In this write-up, we will explore the “Cicada” machine from Hack The Box, categorized as an easy difficulty challenge. This walkthrough will cover the reconnaissance, exploitation, and privilege escalation steps required to capture the flag.
The objective of Cicada:
The goal of this walkthrough is to complete the “Cicada” machine from Hack The Box by achieving the following objectives:
User Flag:
The process begins by leveraging SMB and a null session to enumerate accessible files. After downloading the Notice from HR.txt file, it becomes clear that it contains the password must be changed to a secure one through the company’s online portal. While trying to access the SMB shares using various usernames, the ‘guest’ account reveals multiple valid usernames. One of these is david.orelious.
Upon retrieving the backup script from the share, it was determined that the file contains a password for the user emily.
Root Flag:
Understanding the Issue with netexec on WinRM and SeBackupPrivilege
The netexec command via WinRM from the current directory may fail due to directory-specific permissions or path issues. Additionally, if the SeBackupPrivilege is not properly configured or leveraged, the command could face access restrictions, especially when attempting to interact with protected system files or directories. In cases where the SeBackupPrivilege is available, the command can bypass these restrictions, allowing it to function properly in different directories where necessary permissions or file access might be granted.
Enumerating the Machine on Cicada machine
Reconnaissance:
Nmap Scan:
Begin with a network scan to identify open ports and running services on the target machine.
nmap -sC -sV -oN nmap_initial.txt 10.10.11.35Nmap Output:
┌─[dark@parrot]─[~/Documents/htb/cicada]
└──╼ $nmap -sC -sV -oA initial -Pn 10.10.11.35
# Nmap 7.94SVN scan initiated Sun Feb  9 07:09:11 2025 as: nmap -sC -sV -oA initial -Pn 10.10.11.35
Nmap scan report for 10.10.11.35
Host is up (0.053s latency).
Not shown: 990 filtered tcp ports (no-response)
PORT     STATE SERVICE       VERSION
53/tcp   open  domain        Simple DNS Plus
88/tcp   open  kerberos-sec  Microsoft Windows Kerberos (server time: 2025-02-09 18:52:39Z)
135/tcp  open  msrpc         Microsoft Windows RPC
139/tcp  open  netbios-ssn   Microsoft Windows netbios-ssn
389/tcp  open  ldap          Microsoft Windows Active Directory LDAP (Domain: cicada.htb0., Site: Default-First-Site-Name)
|_ssl-date: TLS randomness does not represent time
| ssl-cert: Subject: commonName=CICADA-DC.cicada.htb
| Subject Alternative Name: othername: 1.3.6.1.4.1.311.25.1::<unsupported>, DNS:CICADA-DC.cicada.htb
| Not valid before: 2024-08-22T20:24:16
|_Not valid after:  2025-08-22T20:24:16
445/tcp  open  microsoft-ds?
464/tcp  open  kpasswd5?
636/tcp  open  ssl/ldap      Microsoft Windows Active Directory LDAP (Domain: cicada.htb0., Site: Default-First-Site-Name)
| ssl-cert: Subject: commonName=CICADA-DC.cicada.htb
| Subject Alternative Name: othername: 1.3.6.1.4.1.311.25.1::<unsupported>, DNS:CICADA-DC.cicada.htb
| Not valid before: 2024-08-22T20:24:16
|_Not valid after:  2025-08-22T20:24:16
|_ssl-date: TLS randomness does not represent time
3268/tcp open  ldap          Microsoft Windows Active Directory LDAP (Domain: cicada.htb0., Site: Default-First-Site-Name)
|_ssl-date: TLS randomness does not represent time
| ssl-cert: Subject: commonName=CICADA-DC.cicada.htb
| Subject Alternative Name: othername: 1.3.6.1.4.1.311.25.1::<unsupported>, DNS:CICADA-DC.cicada.htb
| Not valid before: 2024-08-22T20:24:16
|_Not valid after:  2025-08-22T20:24:16
3269/tcp open  ssl/ldap      Microsoft Windows Active Directory LDAP (Domain: cicada.htb0., Site: Default-First-Site-Name)
|_ssl-date: TLS randomness does not represent time
| ssl-cert: Subject: commonName=CICADA-DC.cicada.htb
| Subject Alternative Name: othername: 1.3.6.1.4.1.311.25.1::<unsupported>, DNS:CICADA-DC.cicada.htb
| Not valid before: 2024-08-22T20:24:16
|_Not valid after:  2025-08-22T20:24:16
Analysis:
- Port 53 (DNS): Handles domain name resolution.
- Port 88 (Kerberos): Authentication service for Active Directory; potential time skew issue detected.
- Port 135 (MSRPC): Used for remote procedure calls.
- Port 139 (NetBIOS-SSN): Supports legacy file and printer sharing.
- Port 389/636 (LDAP/LDAPS): Active Directory LDAP services, useful for enumeration.
- Port 445 (SMB): File sharing and authentication; possible SMB relay attack vector.
- Port 464 (Kpasswd5): Kerberos password change service, may allow credential manipulation.
- Port 3268/3269 (Global Catalog LDAP/LDAPS): Facilitates cross-domain AD queries.
Samba Enumeration:
Since SMB is available, initiate a null session to enumerate accessible shared files.

The HR folder has read permissions, allowing access to review its contents.

Only a single file, Notice from HR.txt, is present.


Use the mget command to download the Notice from HR.txt file to our machine.

The screenshot above shows a standard onboarding email from Cicada Corp, welcoming a new employee and guiding them through their first login. It provides a temporary password that must be used to access the account for the first time. The email stresses the importance of changing this password immediately to something strong and unique. The steps are straightforward: log in with the default password, go to account settings, find the “Change Password” option, and set a new password that includes a mix of letters, numbers, and special characters.
Security is a priority, and the company reminds employees not to share their passwords with anyone. If they run into issues, they can contact support at support@cicada.htb. The message ensures the new hire understands the importance of keeping their account secure while making the onboarding process smooth.
Netexec and smb enumeration

As no valid user is present, execute \\pipe\\lsarpcrid-brute for enumeration.

Without specifying a username, no results are returned. However, when using ‘guest’, a list of available usernames is revealed.

The extracted entries contain various types of accounts. Apply a filter using SidTypeUser to isolate the valid usernames.


Next, perform a password spray attack using the following command:
netexec smb 10.10.11.35 -u user.txt -p 'Cicada$M6Corpb*@Lp#nZp!8' --rid-bruteThe result reveals a valid user; however, they lack the necessary permissions to access SMB content.

Retrieve another user’s credentials:
cicada.htb\david.orelious:aRt$Lp#7t*VQ!3 Since the DEV folder was previously inaccessible, attempt to access it using this user.
Smbclient enumeration on Cicada
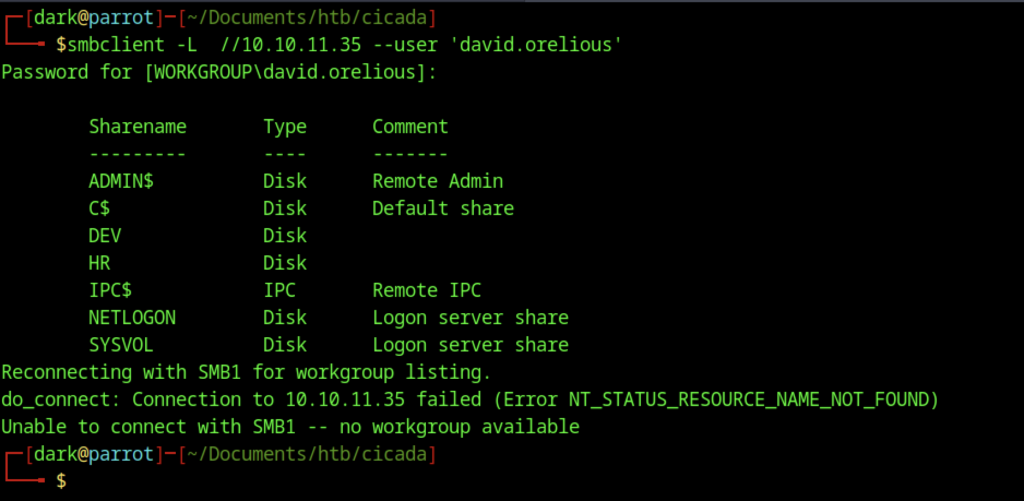
Since the DEV folder was previously inaccessible, attempt to access it using this user.

Using the obtained credentials, access to the DEV samba share is now possible.
Analysis on ps1 file from Samba directory

The directory contains a backup_script file. Download it for further analysis.

Accessing the HR share with david.orelious reveals the same file as before.

The file contains a password associated with the user Emily.


It appears to have failed at this moment.

The netexec command fails in the current directory via WinRM, but works when the directory is changed.

However, access can be gained through evil-winrm. However, access can be gained through evil-winrm.

We can read the user flag by typing the “type user.txt”
Escalate to Root Privileges Access
Privilege Escalation:

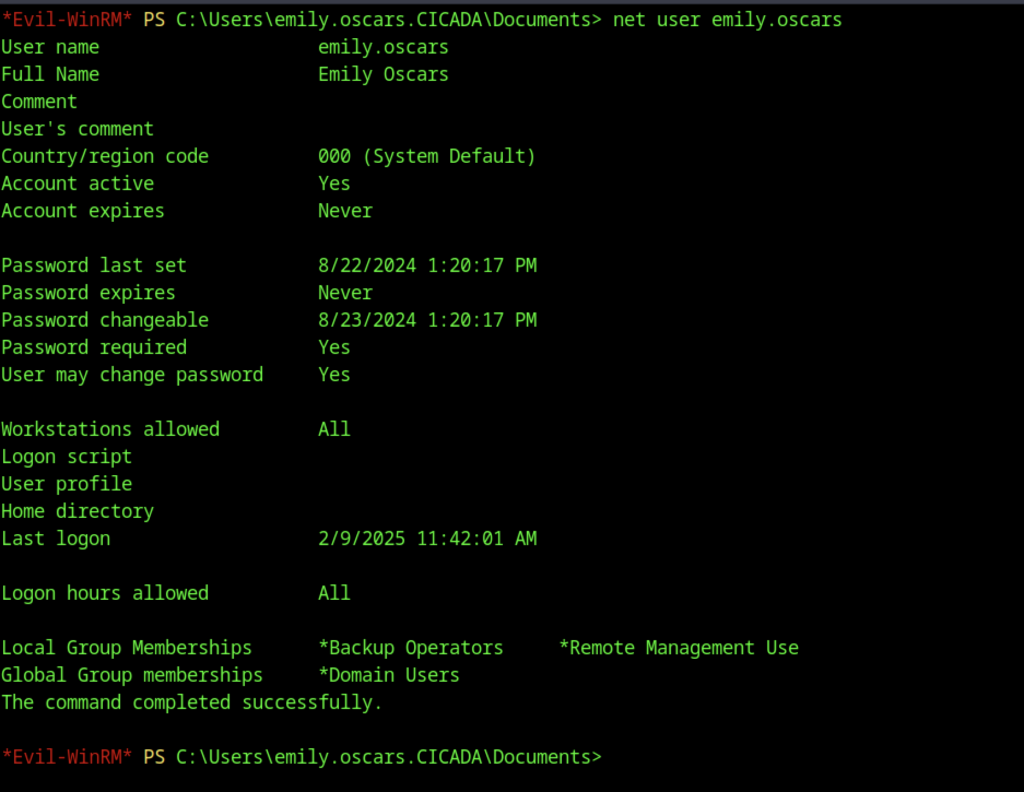
The user has the SeBackupPrivilege permission, which is typically used as a cache. In the case of Active Directory (AD), passwords are only stored in the .samntds.dit file.
SeBackupPrivilege enumeration
The SeBackupPrivilege in Windows allows users or processes to back up files and directories, bypassing access control settings. This privilege is essential for administrators or backup tasks to read files, even without explicit permissions.
In the context of Active Directory (AD), SeBackupPrivilege can grant access to sensitive files like .samntds.dit, which contain password data. While designed for backups, it can be a security risk if misused, as it enables access to restricted, encrypted data.
SAM and SYSTEM details
In a Windows operating system, the SAM (Security Account Manager) and SYSTEM files are integral components that store critical information related to system security and configuration:
- SAM (Security Account Manager):
The SAM file is responsible for managing local user account data, including usernames and hashed passwords, on a Windows system. Located in the Windows\System32\config directory, it is a crucial repository for user authentication. Due to its sensitivity, the SAM file is heavily protected to prevent unauthorized access, ensuring that only privileged users or services can read its contents. - SYSTEM:
The SYSTEM file contains essential configuration settings for the Windows operating system, including the system’s registry data, machine-specific configurations, and active drivers. Stored in the Windows\System32\config directory, this file is fundamental to the operating system’s operation and stability, dictating how system-level processes and services are managed.
Dumping those files on Cicada Machine

Simply perform a backup to obtain the two files, transfer them to the local machine, and then use them to extract the hash

Both of these files can be found in the ProgramData directory, provided they are saved or generated there.

Transfer both files to our local machine.

The command impacket-secretsdump -sam sam -system system local is a tool used to extract password hashes and other sensitive information from the SAM and SYSTEM files on a local machine. The impacket-secretsdump utility, part of the Impacket toolkit, is designed to dump critical information such as password hashes, user data, and encryption keys. In this command, the -sam sam argument specifies the SAM file, which contains local user account information and password hashes, while the -system system argument points to the SYSTEM file, which contains necessary registry data to decrypt these password hashes.
By including the local option, the command indicates that the extraction is being performed on the local system, typically during a security audit or penetration test. This technique is often used to gain insight into a system’s user credentials by extracting and analyzing password hashes for potential cracking.


