In this post, I would like to share a walkthrough of the Timing Machine from Hack the Box
This room has been considered difficulty rated as a medium machine on Hack The box

What will you gain from Timing machine?
For the user flag, you will use LFI to get username and password
As for the root flag, you need to use the axel file to forward our Public ssh key into root directories
Information Gathering on Timing Machine
Once we have started the VPN connection which requires download from Hackthebox, we can start information gathering on the machine by executing the command nmap -sC -sV -p- <IP Address> -PN

Let’s access the website interface to find any vulnerability that we can exploit

The website interface will only show a login page but we didn’t manage to obtain any credentials at all.
Let’s enumerate the website directory using gobuster tool.

On the gobuster result, we only notice only a few directories that look into.

However, we can enumerate more directories that ended with the .php formating.

Sadly, we got a blank page when trying to access the image.php file

Let’s try to execute some Local File Inclusion (LFI) methods to get some information on the user

We managed to get content that contain some base64 encoded via php filter

We should be able to decrypt the base64 encode by running the command “echo -n <base64 encoded> | base64 -d“

Let’s see who have access to the machine by checking on the /etc/passwd via php filter method

It’s an extensive list of users and I managed to notice that Aaron is another user that we can use.
Gaining Privileges Access on Timing machine

I’m assuming that the username and password can be Aaron itself

Finally, we have successfully access to the Dashboard as user 2

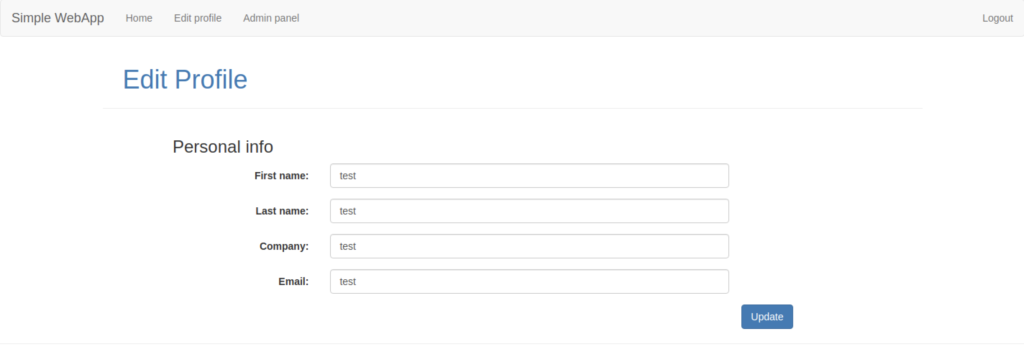
Therefore, i have roaming around the website Dashboard and noticed there’s form on “Edit Profile“

As a result, let’s inspect the traffic using the burpsuite which look something as above

I was thinking that there might be a file called upload.php been stored inside the machine.

From the source code, we have verified that the file will be converted to hashing algorithms and a file called admin_auth_check.php stored inside the machine.

Let’s try to read the file by going there.

From my understanding of the source code, I notice that any role that is not equal to 1 will not allow accessing the admin panel

Let’s modify the traffic packet by adding the role=1 after the company=test&

Voila! We have successfully accessed the admin panel
Trying to upload shell file

Therefore, let’s click on the admin panel which lead us to the Upload page
We should read the upload.php configuration file so that we can understand the function of upload better

Let’s try to use shell.jpg?shell.php like shown above to test the theory of shell

We can see the traffic packet by using burpsuite and we shouldn’t change anything yet to test

However, we got an error saying “This extension is not allowed“

We required to change on the Content-Type from application/x-php to txt/php

At last, it worked like a charm

However, we cannot read the file at all due to Forbidden page

We can get the hashing file name by running a python one line such as shown above

Let’s grab the file via gobuster tool

Let’s use php filter to get some details inside the machine’s server but sadly we got a blank page

However, let’s open the file directly under image.php?img= and finally it worked!
Using burpsuite


Let’s use burpsuite so that we can see clearly what is happening.

(You need to use Unicode for the command)


Some of the directories that we look into using those methods

There’s a file called “source-files-backup.zip” that stored inside the /opt directory

We are required to move that file to /var/www/html/images/uploads so that we can download the file

We can use wget command

Also, we can download the file from the browser
Let’s explore Source-files-backup.zip

Let’s unzip the file

There’s a .git directory that looks odd here


We can extract the .git directory by using the command above.

We have 2 folders after completed the command above


As a result, we have the password which leads to a password for ssh

Uwuuu! We have successfully accessed the machine via ssh

We can read the user flag by executing the command “cat user.txt”
Escalate to Root Privileges Access on Timing Machine

For the SUID binary file, we can look by running “sudo -l” where we found out that netutils can be abused.

After a while doing research, we found out some information about netutils


The information that we retrieve above is all we needed for our next step


Let’s run the binary program so that we can verify what is happening behind the scene.

We managed to verify that Axel is been used for the User-Agent and let’s do some research on it.


Let’s download the axelrc.example over here

For this file to be working as planned, we need to modify the default_filename = default into default_filename = /root/.ssh/authorized_keys

Once we have completed do some modifications, we are required to download the file on Aaron’s home directory

We were also required to copy-paste the SSH public key into one new file and save it as index.html

Let’s execute the binary file as shown above and we notice that Opening output file /root/.ssh/authorized_keys which it’s a good news

Let’s access the machine using our private ssh key

As usual, we can read the root flag by running the “cat root.txt” command
-THE END-
Happy Learning Guys!
Extra Information
We can go to /etc/shadow so that we can unlock and read the write-up


No responses yet